Showing posts with label SPACE.FORM.STRUCTURE. Show all posts

Tuesday, 1 November 2016

Accessibility Audit @ NID

As a part of a workshop on Universal Design, we conducted an audit of our campus - National Institute of Design to check how accessible it is for people with disabilities. For this, we blindfolded ourselves, used crutches and a wheelchair ourselves to view, feel and experience the world from the perspective of a person with disabilities.


Tuesday, 18 August 2015

Healthy Food Habits : Posters

I recently did a course on Human Centred Design with my friends- Aboli, Saumya and Vivek on Promoting Healthy Eating Habits in our College Mess.

The following posters were made by me. They are to be put on the wall in front of which Fruit is served for Breakfast, Salad/ a drink for Lunch and a Sweet Dish for Dinner. The user testing of these is yet to be done.


The picture above has been taken from the internet and edited by me. All copyrights belong to the respective owner.

Saturday, 24 January 2015

Association Chain using Visuals

Association chains basically mean the way a person makes connections in his mind. When we are drawing it out, the connections can be visual, intellectual, a mix of both or can proceed in the form of a story.

Visual connections/ associations are usually made on the basis of form. Connections that proceed in the form of a story, can be a bit vague but are based on a story or a sequence of events.


Wednesday, 26 November 2014

Guide to Bird Watching

A series of drawings of birds made by me as a kid. Now, I can pretend that I made a bird watching guide as a primary school student.


The line quality and colouring is very poor. At that time, spellings were new for me and I even used to write the date wrong. But, yes it was a very enjoyable period of time. I am sure some of us must have experienced something similar.

Thursday, 13 November 2014

Painting with Rolling Marbles

This trippy, colourful and crazy composition was made with rolling marbles and blobs of paint put in a serving tray.


Tuesday, 7 October 2014

Form using Linear Material

Picture of Linear Form

Our objective is to create a Form suggesting a surface or volume, using linear materials like MS strips (Mild Steel), SS strips (Stainless Steel), Polystyrene strips, paper strips etc.

Step 1: Selection of Keywords

Select a few keywords of your choice for instance Fluid, Curve, Direction, Intersecting, Consistent, Connected, Energetic, Integrated, Continuous, Acceleration or something along these lines.
I have chosen Acceleration and Fluid.
After the selection of keywords, do a brainstorming session on these words and put all your thoughts-random or solid on paper.
Picture of Selection of Keywords


Step 2: Ideation

Picture of Ideation  Picture2.jpg

Put your thoughts on paper in the form of sketches.
They help to visualize better in 3D.

Step 3: Materials Required
1. Ivory Sheet, White Card Sheet
2.PP Sheet, Polystyrene sheet
3. Mild Steel Sheet (1mm), Stainless Steel Sheet (1mm)
4. Newsprint/ Copier sheets for sketching
5. Pencil, Sharpener, Cutter and extra blades, Steel Ruler, Scissors
6. Fevicol, Stapler, Hole Punch Machine, Eyelets, Araldite, Chloroform (For joining polystyrene sheets)
7. Glass Strip, MDF Board for base (2.5 mm).

Step 4: Explorations in Paper


Picture of Explorations in Paper     Exploration(3).jpg


Exploration(1).jpg
Cut 1mm strips of White Card sheet and Ivory sheet and just explore keeping your keywords in mind. Some worthwhile explorations will come out.
After making 10- 15 explorations, choose the exploration which best conveys the meaning of the keyword. Try playing with it in different materials.
I have used 0.5 mm MS rod for an exploration and mounted it on an MDF board as base. In another, MS strips(1mm) in width have been mounted on a glass base and attached with Araldite. Similarly, Polystyrene strips have also been used to make a form.

Step 5: Finalized Explorations


Picture of Finalized Explorations
After experimenting, narrow down to Maximum 4 explorations.
However, I'm not laying down any constraint. You can make as many as you want.

Step 6: Final Linear Form


Picture of Final Linear Form   
linear3.JPG

The final linear form can be made using strips of mild steel. Their width is 1.75 mm.The form has been mounted with nails on an MDF base of dimensions - 15' x 8' x 2.5'.The height of the form is 12'.
The MDF base was covered with newspaper and the mid steel strips were painted after a coat of primer. The form has been made in white because the presence of colour may cloud our judgement about the appropriateness of form in a given context.
It is not necessary to make a form similar to this. This was just to give a basic idea of how to proceed in the case of making forms with Linear materials. Also, this activity might seem very artistic but if we associate any meaning with this form or assign a function to it, it will be categorized under DESIGN.

Sunday, 21 September 2014

Form using Planar Materials


I have created a form suggesting a complex surface or a volume, using planar materials. The planar material used here is mill board and thick ivory sheet. I chose two words -'Transition' and 'Encompassing' to depict using the planar material to suggest a complex surface.
The purpose of this activity is to increase and enhance our understanding of the third dimension, surfaces, volumes and creating user experiences through the effective use of form. Form is supposed to evoke a certain emotion in people and if the form is very strong i.e. the users can relate to it and remember it, it becomes it's USP.

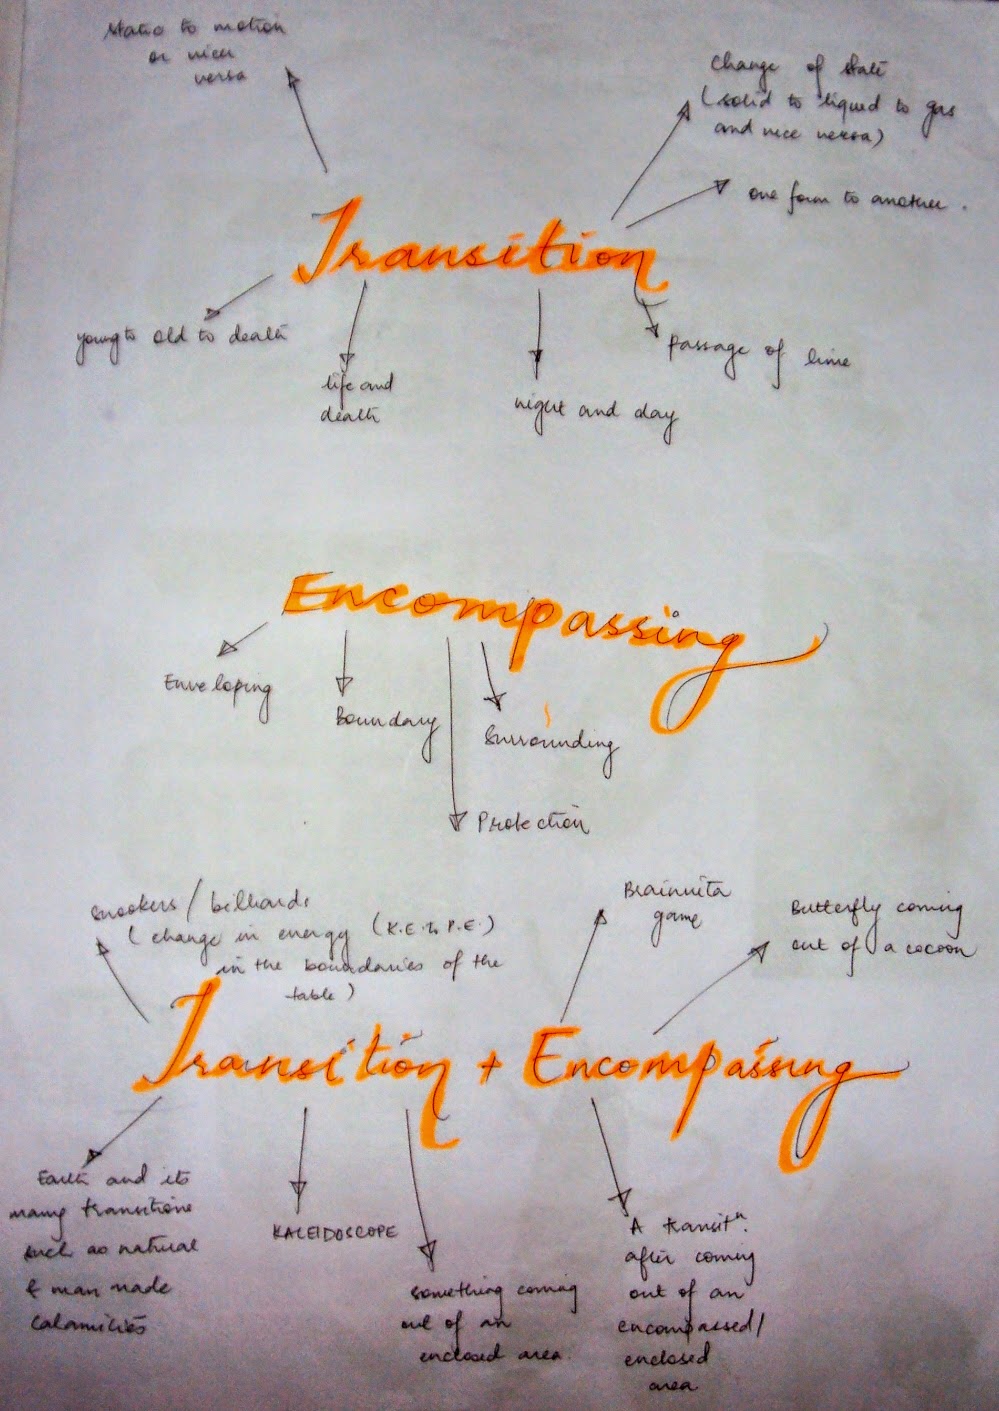
Step 1: Brainstorming

To understand the words properly, write down all the words, objects etc. associated with Transition and Encompassing. You could also choose a word or a combination of words to make a form along similar lines. For instance words like Fluid, Consistent, Connected, Energetic, Integrated, Continuous etc.. Sketching can be used as a tool to visualize your ideas. For instance
Transition- Transformation, Change, suggests movement, caterpillar to butterfly
Encompassing- Enveloping, Encircle
Transition+ Encompassing- Something coming out, breaking the monotony, change of state(Solid, Liquid, Gas)


Step 2: Material Required


1. Mill Board Sheet -350 GSM
2. Thick Ivory sheet - 350 GSM
3.Scissors, Stapler, Cutter with extra blades, Ruler
4. Pencil, Fevicol/ Synthetic White Adhesive
5. Newsprint/ Copier sheets for sketching

Step 3: Exploring Forms


When we start making something, it is good to play around with the material for some time to get a better understanding. Also, sometimes instead of just sketching, playing around and making small explorations can generate more ideas. Therefore, make small 3D models incorporating Transition and Encompassing in the form. Use stapler, eyelets or a stapler to secure the points of joining.
Try to make the form out of one cutout. Although you can join more elements as well.

Step 4: Finding some direction


When you feel that you are just getting there, refine your form. Play around with angles and curves and see which one best suits the purpose. This activity is very abstract, therefore what works for you might not work for others. But a person should be able to guess what you have depicted.

Step 5: Cutout of the finalized form


Cut the final form out with a very sharp blade. In this case, scoring has been done on the curve to give the required 3D curve very easily. Scoring is basically running over the blade with very less pressure on the sheet to enable smooth creasing.
Also, erase all the pencil marks because it makes the form look very shabby.

Step 6: Finish and Admire!


You could scale up or scale down your model depending on the size you require. In this case, the largest form fits in an imaginary outer bounding box of dimensions 15x12x12 inches. The final form could be made out of ivory sheet as well.

Multiple views of the Final form


Thursday, 18 September 2014

Making Mood Boards for Forms

Given below are mood boards for 3D forms that are suggestive of the words - Futuristic, Minimalistic and Mischievous. Mood Boards provide inspiration for further product development in Industrial Design. It is a type of collage with elements arranged in a visually appealing composition. They give an overall feel of the idea, or a thought which is being converted to reality. 

Therefore they are an effective tool to enable THOUGHTS TO THINGS.

FUTURISTIC

The elements used on this mood board are: A rendered form by George Yoo, A neck-piece and tap by Zaha Hadid, A vacuum cleaner, The Shard- a building by Renzo Piano and the Grand Swept Roof of Ferrari World at Abu Dhabi.


 MINIMALISTIC


The elements used on this board are Bleep Bleeps, Body Shop bottles, Chanel No.5 perfume bottle, Wheelbarrows, Clip- A Red Dot Design Award winning product by Paul Sandip and Aer bottles by Godrej.


MISCHIEVOUS


The elements used on this mood board are a chair inspired from molars by Karim Rashid, MugStir by Quirky, A Red Dot Design Award winning fire extinguisher, salad stirrer by Joseph Joseph, a mug, A watering can by Alessi and Melissa shoes by Zaha Hadid.


Monday, 11 August 2014

Multisensory spatial experience - PHOTOS


Location: Paldi char rasta, Ahmedabad, India

Photos clicked at different timings to capture the human activities and their inter relatedness at the location.


A group of men chatting after a round of chai

Wednesday, 14 November 2012

If I were a Kite

If I were a kite,
I would have the right
To soar up in the sky
And fly very very high.

With the help of my wooden bones
I would fly over cities and stones.

Oh! My lovely paper skin
It would be so very thin.
And my frisky ribbon tail,
I would sail through the strongest gale.

How colourful I would be
People would stare and stare at me.
Up above the world so high,

I would fly, fly and fly.

-Harshika Jain