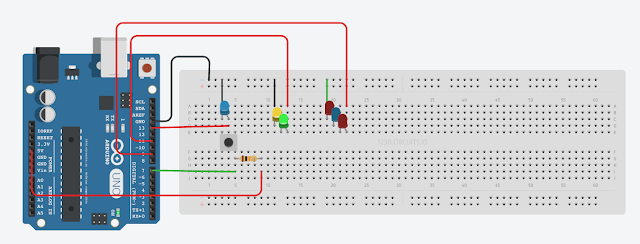
After making an LED blink with the help of a push button (the most basic thing ever), I have been trying different permutations and combinations with LED's, push-buttons, a breadboard, arduino, resistor and of course, jumper cables. I am still a novice, but I want to bring out the small codes I am writing and modifying to share and learn.
The following diagram and code is to make LED's hooked to different pins blink at different times, all with the help of a push-button. (In this example, the push-button has not been used as a switch)
details:
- Resistor used - 1 K
- Red jumper cables - Input/ Voltage
- Black jumper cables - Ground
- Push-button connected to 5V input
// Pin 13 has an LED connected on most Arduino boards. Pin 9 and 11 have been used to hook on more LED's
// give it a name:
int led = 13;
int led2 = 11; //2 pins connected in series
int led3 = 9; //3 pins connected in series
int button = 7;
int val = 0;
// the setup routine runs once when you press reset:
void setup() {
pinMode (led, OUTPUT);
pinMode (led2, OUTPUT);
pinMode (led3, OUTPUT);
pinMode (button, INPUT);
}
// the loop routine runs over and over again forever:
void loop() {
val = digitalRead (button); //checks if any voltage is applied to pin mentioned b/w the parentheses
if (val == 1) { // turn the LED on by making the voltage HIGH
digitalWrite (led, HIGH);
digitalWrite (led2, LOW);
digitalWrite (led3, HIGH);
delay (500); //give a lag of half a second
digitalWrite (led, LOW);
digitalWrite (led2, HIGH);
digitalWrite (led3, LOW);
delay (500);
} else { // turn the LED off , LOW is the voltage level)
digitalWrite (led, LOW);
digitalWrite (led2, LOW);
digitalWrite (led3, LOW);
}
}
observations:
- LED's that have been hooked to the breadboard in series, glow with a lesser intensity than the LED that is alone.
- If 4 LED's were attached in series, none glowed.
The circuit has been made on https://123d.circuits.io/ , an Autodesk software for Arduino simulation.
I would love to have your feedback and do let me know if you spot any mistakes. If you have written codes of similar complexity/ ease, please share.

No comments:
Post a Comment