Showing posts with label HOW TO. Show all posts

Wednesday, 6 April 2016

The Humanure Project : My Experiments with Human Excreta

This post will sum up My Experiments with Human Excreta (so I did this yesterday afternoon). Many people scrunch their noses or tell me that they still have a meal or two left in the day when I tell them about what I am upto. Sure, it smells bad and sure, it looks unappealing. It is gooey to touch. However, it is let out from our body and if we look at the bigger picture, excrement is the end result of a completed food consumption process.

Compost Defined: 
Composting is a process managed by humans involving the cultivation of microorganisms that degrade and transform organic material in the presence of oxygen. When properly managed, the compost becomes so heavily populated with thermophilic microorganisms that it generates heat killing the pathogens that live inside the human body at body temperature. The final product is stable, pathogen and plant seed free and can be beneficially applied to land.

Composting toilets are gaining worldwide popularity as they are not dependent on sewers and also yield a dividend - humus, which allows such a sanitation system to yield a net profit, rather than being a constant financial drain. The composition of human excreta is 65-85% water, Carbohydrates, Proteins that are converted to amino acids, Fat (less than 6%), Fibre and insoluble mineral salts.

Aim: 
To make compost using human excreta.

Saturday, 30 January 2016

Opposite Sex Pen Pals: Love in a Digital World

Living in a super connected world, it is not uncommon to come across good looking people on social networking sites. Sometimes, we do feel like sending a friend request. But, perhaps we should think twice especially if the person is of the opposite sex.

Why do we befriend people whom we know we cannot meet in real life? Why are we digitising love/ lust?It is because we are insecure. Insecure that we do not have enough people in real life to enjoy and have fun with. So here are some pointers to recognize the faults in our stars and make amends.

Saturday, 17 January 2015

Key Lever Mechanism, Typewriter- Remington 2000

The second part of our study of the typewriter as a part of our course - Technical Studies (Faculty: Mr. Ranjit Konkar), required us to replicate one mechanism and we chose the key lever mechanism.  

Okay, it may sound like a biiig mechanism but basically it is how an alphabet is printed on the rolled sheet when the key of the very same alphabet is pressed on the qwerty keyboard. We did this in a group of three.  


Friday, 2 January 2015

Remington 2000- Product Disassembly Process

As a part of our course in the Second Semester of Product Design (Industrial Design), we opened up a typewriter to study its mechanisms. Although it was a highly complicated piece of machinery, we have tried to make some sense out of it.

All photos taken from the internet are copyright to their respective owners. The rest are copyright to us.


Tuesday, 7 October 2014

Form using Linear Material

Picture of Linear Form

Our objective is to create a Form suggesting a surface or volume, using linear materials like MS strips (Mild Steel), SS strips (Stainless Steel), Polystyrene strips, paper strips etc.

Step 1: Selection of Keywords

Select a few keywords of your choice for instance Fluid, Curve, Direction, Intersecting, Consistent, Connected, Energetic, Integrated, Continuous, Acceleration or something along these lines.
I have chosen Acceleration and Fluid.
After the selection of keywords, do a brainstorming session on these words and put all your thoughts-random or solid on paper.
Picture of Selection of Keywords


Step 2: Ideation

Picture of Ideation  Picture2.jpg

Put your thoughts on paper in the form of sketches.
They help to visualize better in 3D.

Step 3: Materials Required
1. Ivory Sheet, White Card Sheet
2.PP Sheet, Polystyrene sheet
3. Mild Steel Sheet (1mm), Stainless Steel Sheet (1mm)
4. Newsprint/ Copier sheets for sketching
5. Pencil, Sharpener, Cutter and extra blades, Steel Ruler, Scissors
6. Fevicol, Stapler, Hole Punch Machine, Eyelets, Araldite, Chloroform (For joining polystyrene sheets)
7. Glass Strip, MDF Board for base (2.5 mm).

Step 4: Explorations in Paper


Picture of Explorations in Paper     Exploration(3).jpg


Exploration(1).jpg
Cut 1mm strips of White Card sheet and Ivory sheet and just explore keeping your keywords in mind. Some worthwhile explorations will come out.
After making 10- 15 explorations, choose the exploration which best conveys the meaning of the keyword. Try playing with it in different materials.
I have used 0.5 mm MS rod for an exploration and mounted it on an MDF board as base. In another, MS strips(1mm) in width have been mounted on a glass base and attached with Araldite. Similarly, Polystyrene strips have also been used to make a form.

Step 5: Finalized Explorations


Picture of Finalized Explorations
After experimenting, narrow down to Maximum 4 explorations.
However, I'm not laying down any constraint. You can make as many as you want.

Step 6: Final Linear Form


Picture of Final Linear Form   
linear3.JPG

The final linear form can be made using strips of mild steel. Their width is 1.75 mm.The form has been mounted with nails on an MDF base of dimensions - 15' x 8' x 2.5'.The height of the form is 12'.
The MDF base was covered with newspaper and the mid steel strips were painted after a coat of primer. The form has been made in white because the presence of colour may cloud our judgement about the appropriateness of form in a given context.
It is not necessary to make a form similar to this. This was just to give a basic idea of how to proceed in the case of making forms with Linear materials. Also, this activity might seem very artistic but if we associate any meaning with this form or assign a function to it, it will be categorized under DESIGN.

Sunday, 21 September 2014

Form using Planar Materials


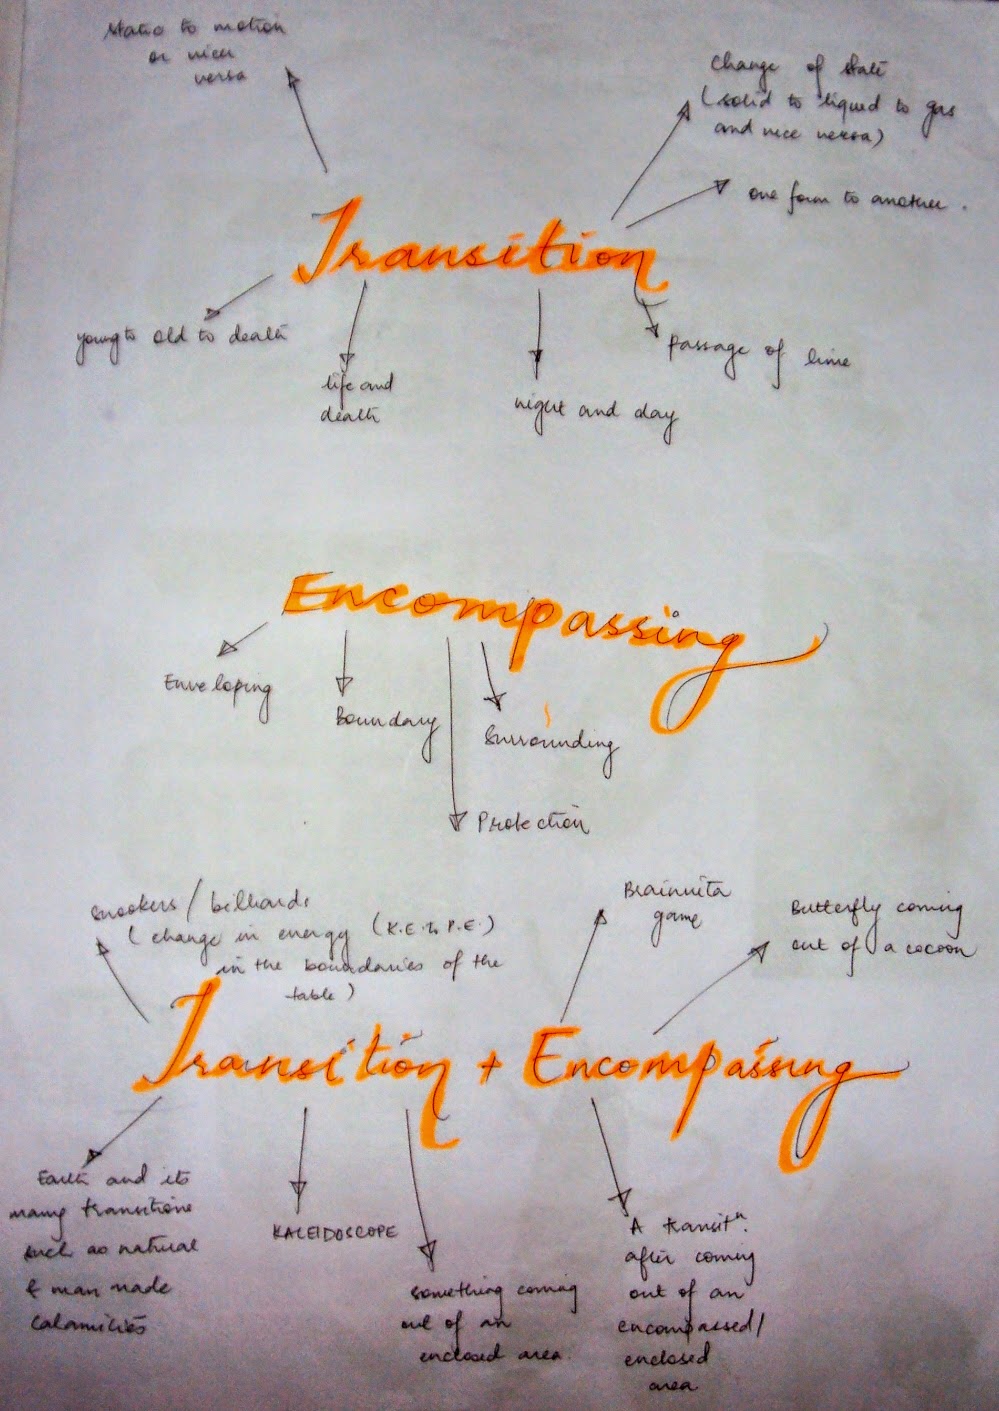
I have created a form suggesting a complex surface or a volume, using planar materials. The planar material used here is mill board and thick ivory sheet. I chose two words -'Transition' and 'Encompassing' to depict using the planar material to suggest a complex surface.
The purpose of this activity is to increase and enhance our understanding of the third dimension, surfaces, volumes and creating user experiences through the effective use of form. Form is supposed to evoke a certain emotion in people and if the form is very strong i.e. the users can relate to it and remember it, it becomes it's USP.

Step 1: Brainstorming

To understand the words properly, write down all the words, objects etc. associated with Transition and Encompassing. You could also choose a word or a combination of words to make a form along similar lines. For instance words like Fluid, Consistent, Connected, Energetic, Integrated, Continuous etc.. Sketching can be used as a tool to visualize your ideas. For instance
Transition- Transformation, Change, suggests movement, caterpillar to butterfly
Encompassing- Enveloping, Encircle
Transition+ Encompassing- Something coming out, breaking the monotony, change of state(Solid, Liquid, Gas)


Step 2: Material Required


1. Mill Board Sheet -350 GSM
2. Thick Ivory sheet - 350 GSM
3.Scissors, Stapler, Cutter with extra blades, Ruler
4. Pencil, Fevicol/ Synthetic White Adhesive
5. Newsprint/ Copier sheets for sketching

Step 3: Exploring Forms


When we start making something, it is good to play around with the material for some time to get a better understanding. Also, sometimes instead of just sketching, playing around and making small explorations can generate more ideas. Therefore, make small 3D models incorporating Transition and Encompassing in the form. Use stapler, eyelets or a stapler to secure the points of joining.
Try to make the form out of one cutout. Although you can join more elements as well.

Step 4: Finding some direction


When you feel that you are just getting there, refine your form. Play around with angles and curves and see which one best suits the purpose. This activity is very abstract, therefore what works for you might not work for others. But a person should be able to guess what you have depicted.

Step 5: Cutout of the finalized form


Cut the final form out with a very sharp blade. In this case, scoring has been done on the curve to give the required 3D curve very easily. Scoring is basically running over the blade with very less pressure on the sheet to enable smooth creasing.
Also, erase all the pencil marks because it makes the form look very shabby.

Step 6: Finish and Admire!


You could scale up or scale down your model depending on the size you require. In this case, the largest form fits in an imaginary outer bounding box of dimensions 15x12x12 inches. The final form could be made out of ivory sheet as well.

Multiple views of the Final form


Wednesday, 27 August 2014

Chiseled Infinite Spiral


This is an infinite spiral which I chiseled out from a piece of teak wood. If you run your finger in the semicircular cavity, you would return to the same place after covering each of the six faces of the cuboid block. Besides this, it smells awesome.

MATERIALS AND TOOLS REQUIRED:


Material: 1.5"x 12" block of teak wood (grains running length wise)
Tools:
1) Mallet
2) Backsaw
3) Files: Rough, Smooth, Half Round, Round
4) Chisel: Flat, Round
5) Marker (made of metal)
6) Sandpaper: P80, P120, P210
7) Planer
8) Compass
9) G- Clamp
PLANNING WHAT TO MAKE:
1) Planning the pattern on all faces of the block is the first thing to be done before starting.
2) Plane all sides of the wood piece after clamping it with a G- Clamp.
3) Draw out the required pre- planned pattern on the piece of wood with a pencil and then mark it out with a marker.
CHISELING:
With the flat chisel and mallet, make v- shaped wedges into the piece of wood. After this, chisel with the round chisel. The point where the spiral moves from one face to another should be done very carefully as the radius of curvature can go out of out of control.
Position the chisel with its bevel side up for deep cuts and bevel side down for concave curves and fine shaving. The chisel is held at an angle of roughly 45 degrees. After the chiseling has been done on the flat faces, move onto the top and bottom part. At these areas, even a bit of extra pressure will split the wood.
FINISHING:
1) Begin filing to remove small pieces of wood and smoothing rough edges. The half round chisel and the round chisel have to be used simultaneously. For the parts where the spiral moves from one face to another, use the round file.
2) After filing has been done, begin sanding. Some tough to reach areas can be smoothed with a sandpaper. Use the most coarse one, followed by the medium and fine sandpaper until a very smooth, bump free surface is obtained.
3) For the final finishing, take another piece of teak wood and rub your infinite spiral with it. The natural resin present in the teak wood comes out giving it a very natural and glossy finish. Alternatively, wax or lacquer can also be used for finishing. Wax gives a matt finish while lacquer gives a glossy finish.
ADMIRE:

Sit back and admire your handiwork. You could also smell your piece because the resin in the teak makes it smell really good.

JUST FOR FUN:


 Replicate the texture of wood on an OHP sheet using acrylic paints just for fun and experimentation.


Tuesday, 26 August 2014

Pointillism


I have made the scene of an Indian Circus inspired from George Seurat's painting- The Circus. I changed the clothes of the audience and gave them a suitable Indian attire. Instead of a horse, an elephant has been shown. I went to a circus when I was very small so I tried to put all the elements that I remember in the painting like the acrobats, the man blowing fire, a man walking on stilts and a woman doing tricks with a hoop.
I also saw a movie- 'Dekho Indian Circus' and was highly inspired by it. After seeing the desperation and excitement in the eyes of the children to go to the circus, I could also feel the thrill and tried to bring that in the painting.
STUDYING THE STYLE OF THE ARTIST:

Before making a painting in the style of an artist, one should study it and do proper research. Therefore, I did some research on Pointillism and colour interaction with the use of dots.
If dots of different colours like red and blue are applied in the same area, then that patch looks purple if viewed from a distance.
Pointillism is a technique of painting in which small, distinct dots of pure color are applied in patterns to form images.Georges Seurat developed the technique in 1886, branching from impressionism and the movement was later known as Neo-impressionism.
INSPIRATION:

I took reference from other paintings of Seurat like A sunday on Le Grande Jette, Le Chahut and boats. For the gestures, I took external reference images of acrobats, an elephant etc. and after practicing it for some time, drew it out.

MATERIALS REQUIRED:

1. Round Brushes -6, 4, 2, 0, 00
2. Poster Colour or whatever other medium is suitable to you
3. Cartridge paper
4. Water Bowl
5. Palette
6. Rag
7. Pencil
HANDS ON!
1.Make the basic layout of your painting with reference to the painting of Seurat - The Circus.
2. For the base coat, apply dull colours in appropriate areas. In this painting, mostly earthy colours like yellows, oranges and brown are used.
3. Start pointillism. Take a small quantity of paint in your size 6 brush and put dots on areas which have less detailing. As you gradually move to smaller areas, switch to thinner brushes like 4 and 2. 0 and 00 should be kept aside for adding shading and the final touches.
4. Do not put shaded or highlighted areas in the first layer of pointillism. After your whole sheet has been covered with the basic colours start adding the shades. The shaded areas can also have many layers. Many tints and shades of a particular colour can be used for shading and highlights.
TIPS:
1. Before applying a dot, remove all excessive paint from the brush. The dot shouldn't be watery because after it dries, it isn't very visually pleasing.
2. Do not mix excessive water in the paint.
3. When you open a new bottle of poster paint, drain out the oil from the top and mix the contents of the bottle really well with the back of your brush to get good, thick, consistent paint.
4. Always take paint from a palette. It helps you to mix colour well plus removing excessive paint from the brush becomes very easy.
5. Start painting from the top of the sheet so that your hand doesn't dirty the lower portion of the sheet if it's already painted. For adding layers, ensure that the rest of the coats are dry and while painting, put a piece of OHP sheet on the drawing sheet to prevent it from getting dirty.
MOTIVATION:
Pointillism is very time consuming so don't lose your patience.
Because in the end, the result will amaze you.:D


Saturday, 16 August 2014

How to be Normal and Socially Acceptable

Earlier, I had written about how to be weird. But this is just the opposite. To be socially acceptable, accept the fact that you have to socialize, and that too a lot.

So here goes:

1. Listen to the most popular songs that your friends are listening to, watch videos of songs that have won Grammy's and to be on the safer side, keep the language preference to English. So when someone is listening to a song that you most probably would have heard, say-"Oh my god! isn't this the awesomest song ever! ". And you will surely find a normal friend.

2. Coordinate all your timings as your friends' timings. So when majority of your friends go to sleep, you also go to sleep. This way you will also wake up at the same time as they do ad you will get to socialize better this way.

3. Always follow the latest trend. So if there is a new trend of wearing ankle socks, wear ankle socks or if everyone is getting haircuts with trimmers, you do so as well. If people are getting their hair streaked, you also do so.

4. Watch Pretentious Movie reviews on Youtube.

5. Be up to date with the latest short forms like YOLO- You Only Live Once or its counter-philosophy -YODO- You Only Die Once, TYVM - Thank You Very Much, TTYL- Talk To You Later etc. and for god's sake, use them whether on social networking sites or while carrying out a conversation. And be liberal with the use of # hash tags #.

6. If you see a well dressed person, mirror his/her style. Because to be socially acceptable, style and looks matter a lot. If you are well dressed, you feel confident.

7. If you have a very gross joke in mind, or a joke that you yourself think is not funny, do not spread it.

8. Maintain a healthy body. After all, what do supermodels eat? Cabbage and lettuce. So stick to healthy food. It's good to have a colourful meal so it's good to have a colourful plate. But once in a while, indulge in ice cream, chips, fries, bunmuska or burgers or other junk food. That's what normal people do.

9.Keep a check on your emotions in public. If you are a very moody person, try to be adjusting. If you feel sad or like crying, don't cry. Instead keep a smile on your face. Sometimes it is okay to have outbursts of emotions, but overly emotional people are not liked. Also don't whine all the time if you have a habit to do so. It is a big put off for people.

10. Participate in social events. If you have a batch party, or a group performance or activities that you do as group, go for them. You may not like them, but it's social protocol, you see. In parties and group events, people socialize a lot, so you also get to socialize. In dance parties, don't stand in the corner. Let go of your inhibitions, and just go dance.

11. Be confident. Be sure of what you are saying. If you aren't sure of what you want to say, don't say it. Don't come across as a highly opinionated person but maintain that delicate balance between overconfidence and under-confidence. Confident people, who generally know what they want from life are highly socially acceptable.

In the end, I would like to add that people who want to be socially acceptable are the ones who think they are not. After all who decides what is socially acceptable and what is not- the society. Therefore it is not something which one should yearn to do. Deciding or setting social norms is group opinion. It is your choice if you want to follow it or not. YOLO. So do what you want. Be the square peg in the round hole and get out of your comfort zone. Trust me, you will be fine.

Friday, 18 July 2014

Date Card Ideas

Recently I had date week in college as a part of ice breaking with the new entrants in college. We had to send good date cards to make our dates i.e. the first years feel special and wanted. Then on the last day of the week we had to take them out for dinner.In date week, we pretend that we are fake dating someone. 

So here are some ways in which you can go about it. Plus you can always use these for an actual date.

1. Send some cheesy crazy lines from movies or pick up lines such as:

a) I'd rather die tomorrow than live a hundred years without knowing you.
b) I'm very discreet but..I will haunt your dreams. 
c) I look for you even  when you are not around.
d) I hope we are not parallel lines. Our lives should intersect.
e) If you were a library, I'd check you out.
f) I wish I could gaze at the stars with you, everyday.

Tuesday, 3 June 2014

How to be Weird

Ever thought of how you can be weird if you are bored of being normal?

Weird means fantastic, abnormal, bizarre, strange or unusual.
Usually people classify others as weird from their appearance and habits. So this can also be taken up as an experimental project to mess with other people's minds.

Here's a list of things you can do:

1. Get piercings at abnormal places or if getting your ears pierced, don't maintain symmetry.

2. Colour your hair with eye catching colours like- electric blue, purple or light green. Or if you happen to have a mohawk, colour it with the seven colours of the rainbow. (applies to beards, sideburns, moustaches as well.

3. Wear ratty t-shirts.

4. Have unusual obsessions like taphophilia, reading books upside down, not walking on areas where two tiles join, guerilla gardening, cryptozoology and picking locks.

5. Invent names for specific actions even if it doesn't make sense. Or mix two words to make a new word. Or better still- if you are living in a country where people are comfortable speaking and understanding two languages do some code - mixing.

6. When a normal discussion is happening, start talking about a new, absolutely unrelated event.

7. Blurt out whatever thoughts are there in your mind whether the other person wants to hear it or not.

8. Have unusual taste buds like the love for only spicy momo sauce (not momos), or beef pickle etc and tell other people how much you like them. Also always try out dishes with names unheard of when you go out with friends like toad in the hole, spotted dick etc.

9. Whenever you are out in a restaurant, call the waiter and ask the ingredients of the most common things like bread, milk whatever.

10. Wear anything without caring to see if the colours complement each other or not.

11. In winters, even if you are freezing and can bear it, wear a half sleeves t-shirt (obviously with a warm woollen inner) and if people ask whether you are feeling cold or not say no.

12. Listen to songs in languages you don't even know and when others ask what music you listen to, popularize that music and defend yourself vehemently.

13. Stare at unknown people and zone off.

Well people don't do these things usually, so unless you want to be categorized as being permanently weird, apply common sense and choose what you should do and what you shouldn't. And above all, don't try to be someone else. Be yourself.